
You might assume that connecting to a VPN instantly shields your online identity, but many users unknowingly expose their real IP addresses through subtle leaks. Even premium VPN services can fail to protect you if DNS requests, WebRTC protocols, or IPv6 traffic bypass the encrypted tunnel. This guide explains what IP leaks are, why they undermine your privacy, and how to detect and fix them using practical tools and settings. By understanding these vulnerabilities, you can take control of your digital footprint and maintain genuine anonymity online.
Table of Contents
- What Is An IP Leak And Why Does It Matter?
- Types Of IP Leaks: DNS, WebRTC, And Beyond
- How To Detect An IP Leak Accurately
- How To Fix And Prevent IP Leaks Effectively
- Keep Your IP Safe With Reliable Tools
- FAQ
Key takeaways
| Point | Details |
|---|---|
| IP leaks expose real addresses | Your actual IP can be revealed despite VPN use, compromising location and identity privacy. |
| Multiple leak types exist | DNS, WebRTC, and IPv6 leaks each bypass VPN protection through different technical pathways. |
| Testing requires multiple tools | Around 60% of free checkers produce false positives due to geolocation lag, so cross-verify results. |
| Premium VPNs offer better protection | Audited services with kill switches and IPv6 support prevent leaks more reliably than free alternatives. |
| Regular monitoring is essential | Network changes like switching Wi-Fi or waking devices from sleep can trigger new leaks. |
What is an IP leak and why does it matter?
Your IP address functions as a unique identifier that websites and services use to recognise your device and approximate location. When you browse without protection, every site you visit logs this address, creating a detailed trail of your online activity. An IP leak occurs when your real IP address is exposed despite using a VPN or proxy, undermining the anonymity you expect from these tools.
The privacy implications are significant. An exposed IP reveals your approximate geographic location, often down to city level, allowing third parties to build profiles of your browsing habits. Your Internet Service Provider becomes visible, and in some cases, sophisticated tracking can link your IP to your actual identity through data brokers or previous online activity. This defeats the primary purpose of using a VPN, which is to mask your digital footprint and prevent surveillance.
Several mechanisms can cause leaks even when you believe you are protected:
- DNS requests that bypass your VPN tunnel and go directly to your ISP’s servers
- WebRTC protocols in browsers that reveal your local and public IP addresses
- IPv6 traffic that escapes through unsecured channels when your VPN only protects IPv4
- Temporary disconnections that expose your real IP before your kill switch activates
Understanding the distinction between DNS leaks and IP leaks helps you identify which protective measures to prioritise. Each leak type requires specific fixes, and recognising the symptoms allows you to address vulnerabilities systematically rather than relying on generic privacy advice.
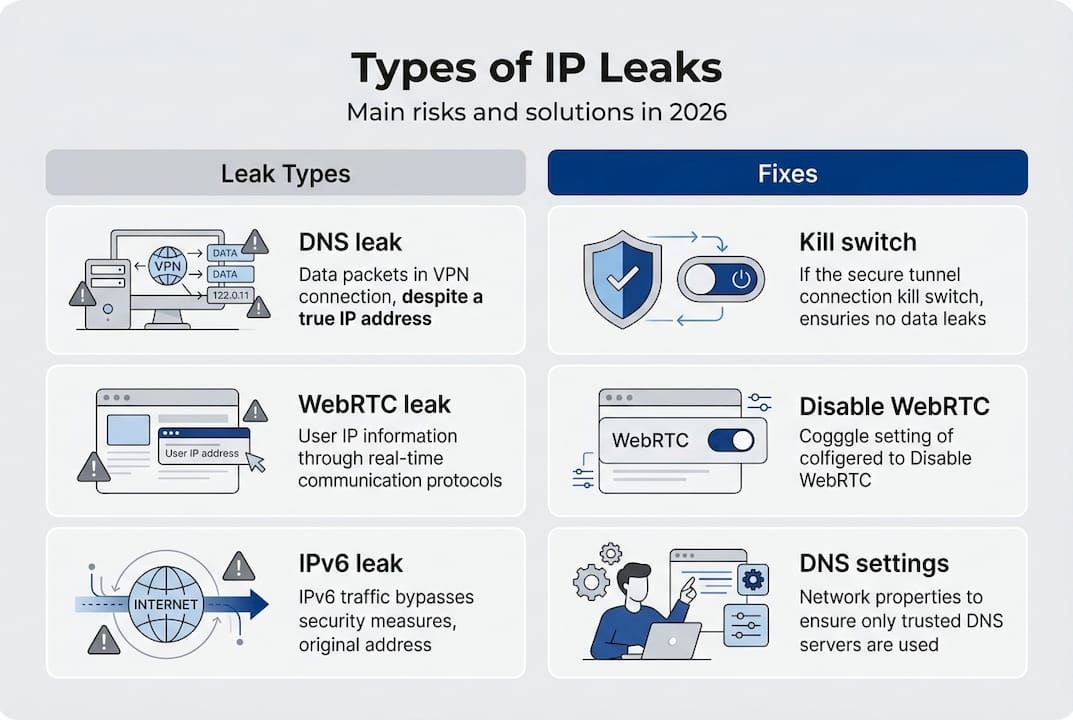
Types of IP leaks: DNS, WebRTC, and beyond
Three main categories of leaks threaten your privacy, each exploiting different technical vulnerabilities. DNS leaks expose visited domains via ISP resolvers, whilst WebRTC leaks reveal real IP through browser STUN queries even when your VPN is active. Standard IP leaks occur when your VPN connection drops or fails to route all traffic through the encrypted tunnel.
DNS leaks happen when your device sends domain name resolution requests directly to your ISP’s DNS servers instead of through your VPN’s secure DNS. This exposes every website you visit to your ISP, even though your actual browsing traffic remains encrypted. The leak typically occurs due to misconfigured network settings or VPN software that fails to override your system’s default DNS configuration.
WebRTC leaks use ICE and STUN protocols to establish peer connections for video calls and real-time communication. These protocols query STUN servers to discover your public IP address, bypassing your VPN tunnel entirely. Browsers like Firefox and Chrome enable WebRTC by default, making this a widespread vulnerability for users who prioritise video conferencing or browser-based communication tools.

| Leak type | Primary cause | Data exposed | Common scenario |
| — | — | — |
| DNS leak | ISP DNS servers used | Visited domains, browsing history | Misconfigured VPN settings |
| WebRTC leak | Browser STUN queries | Real public and local IP | Video calls, browser apps |
| IP leak | VPN disconnection | Full IP address, location | Network switching, sleep mode |
| IPv6 leak | Unprotected IPv6 traffic | IPv6 address, ISP details | VPN lacks IPv6 support |
IPv6 leaks represent an emerging threat as more networks adopt the newer protocol. Many VPN services only protect IPv4 traffic, allowing IPv6 requests to bypass the tunnel and expose your address. This creates a false sense of security where your IPv4 address appears masked whilst your IPv6 address remains visible to tracking services.
Pro Tip: Disabling WebRTC in your browser eliminates a major IP leak risk for casual users. Access your browser’s advanced settings or install a privacy extension to block WebRTC requests without affecting normal browsing. This single step prevents most browser-based leaks and requires no technical expertise. For comprehensive protection, combine this with a VPN leak test to verify all potential vulnerabilities.
How to detect an IP leak accurately
Testing for IP leaks requires more than visiting a single website and checking your displayed address. Detection tools like ipleak.net and dnsleaktest.com check IPv4, IPv6, DNS, and WebRTC to provide comprehensive results. However, around 60% of free tools generate false positives due to geolocation database lag, where your VPN server location hasn’t updated in regional databases.
Follow this procedure to test your IP leak status accurately:
- Disconnect from your VPN and visit an IP lookup tool to record your real IP address and location.
- Connect to your VPN and verify that your displayed IP changes to match your chosen server location.
- Run tests on at least three different leak detection websites to cross-verify results.
- Check specifically for DNS leaks by comparing DNS server addresses with your VPN provider’s known servers.
- Test WebRTC leaks using dedicated tools that query STUN servers to reveal any exposed addresses.
- Verify IPv6 protection by checking whether your IPv6 address appears alongside your masked IPv4.
False positives often occur when geolocation services lag behind VPN server deployments. Your IP might show as belonging to your ISP’s network even though it actually routes through your VPN, simply because the database hasn’t updated the ownership records. This explains why some tools report leaks whilst others confirm protection.
Cross-verifying results from multiple sources helps distinguish genuine leaks from database errors. If two out of three tools show your real IP whilst one shows your VPN IP, you likely have a genuine leak. Conversely, if only one tool reports a problem whilst others confirm protection, investigate whether that tool uses outdated geolocation data.
Timing matters when testing for leaks. Network transitions create temporary vulnerabilities, so test immediately after connecting to your VPN, after switching between Wi-Fi networks, and after your device wakes from sleep mode. These moments represent the highest risk periods when your real IP might briefly expose itself before your VPN re-establishes full protection.
Pro Tip: Schedule regular leak tests, especially after VPN software updates or system changes that might alter network configurations. Set a monthly reminder to run a comprehensive VPN leak check and verify that all protection mechanisms remain active. This proactive approach catches new vulnerabilities before they compromise your privacy over extended periods. Consider testing from different networks to ensure your VPN protects you consistently across various connection types.
How to fix and prevent IP leaks effectively
Addressing IP leaks requires a combination of VPN configuration, browser adjustments, and conscious service selection. Enable kill switch features, disable IPv6 if unsupported, use VPN DNS servers, and disable WebRTC to create multiple layers of protection. Premium VPN services like NordVPN consistently pass independent leak tests by implementing these safeguards by default.
Your VPN’s kill switch acts as a failsafe that blocks all internet traffic if your VPN connection drops unexpectedly. This prevents your real IP from exposing itself during brief disconnections caused by network instability or server switching. Verify that your kill switch activates at the system level rather than just within the VPN application, ensuring protection even if the VPN software crashes.
IPv6 presents a persistent vulnerability for users whose VPNs lack native IPv6 support. The most reliable solution involves disabling IPv6 entirely at the system level through your network settings. Whilst this prevents you from accessing IPv6-only resources, the security benefit outweighs the minimal inconvenience for most users. Alternatively, choose a VPN provider that routes IPv6 traffic through the same encrypted tunnel as your IPv4 connections.
Browser-level protections complement VPN security:
- Disable WebRTC through browser settings or privacy extensions to prevent STUN server queries
- Configure your browser to use DNS over HTTPS for an additional encryption layer
- Avoid browser extensions that might bypass your VPN tunnel for analytics or content delivery
- Enable strict tracking protection to limit the data websites can collect about your connection
DNS configuration requires attention to ensure your queries route through your VPN provider’s servers. Most quality VPN software handles this automatically, but verify the settings if you experience DNS leaks. Manually specify your VPN’s DNS servers in your network configuration as a backup measure that maintains protection even if the VPN software fails to override system defaults.
| VPN type | Kill switch | IPv6 support | DNS protection | Leak rate |
|---|---|---|---|---|
| Free VPN | Rarely included | Usually absent | Often bypassed | 70%+ leak |
| Budget VPN | Basic implementation | Partial coverage | Inconsistent | 30-40% leak |
| Premium VPN | System-level protection | Full tunnel support | Encrypted DNS | Near 0% leak |
| Audited VPN | Verified active | Independently tested | Certified secure | 0% in tests |
Service selection significantly impacts your leak protection effectiveness. Independent security audits reveal that premium providers with transparent security practices consistently outperform free alternatives. The investment in a reputable VPN service pays dividends through reliable leak prevention, faster connection speeds, and responsive support when configuration issues arise.
Pro Tip: Monitor your connection status during network transitions that commonly trigger leaks. Switching between Wi-Fi networks, moving between mobile data and Wi-Fi, or waking your device from sleep mode can temporarily expose your real IP before your VPN reconnects. Consider manually disconnecting and reconnecting your VPN after these transitions to ensure full protection re-establishes immediately. Combine this habit with periodic leak testing to verify your defences remain intact across different connection scenarios.
Keep your IP safe with reliable tools
Protecting your online privacy requires ongoing vigilance and access to trustworthy verification tools. Regular testing helps you confirm that your VPN and browser configurations continue to prevent IP leaks as networks and software evolve. InstantIPLookup provides comprehensive IP lookup services that reveal exactly what information websites can see about your connection, allowing you to spot vulnerabilities before they compromise your anonymity.
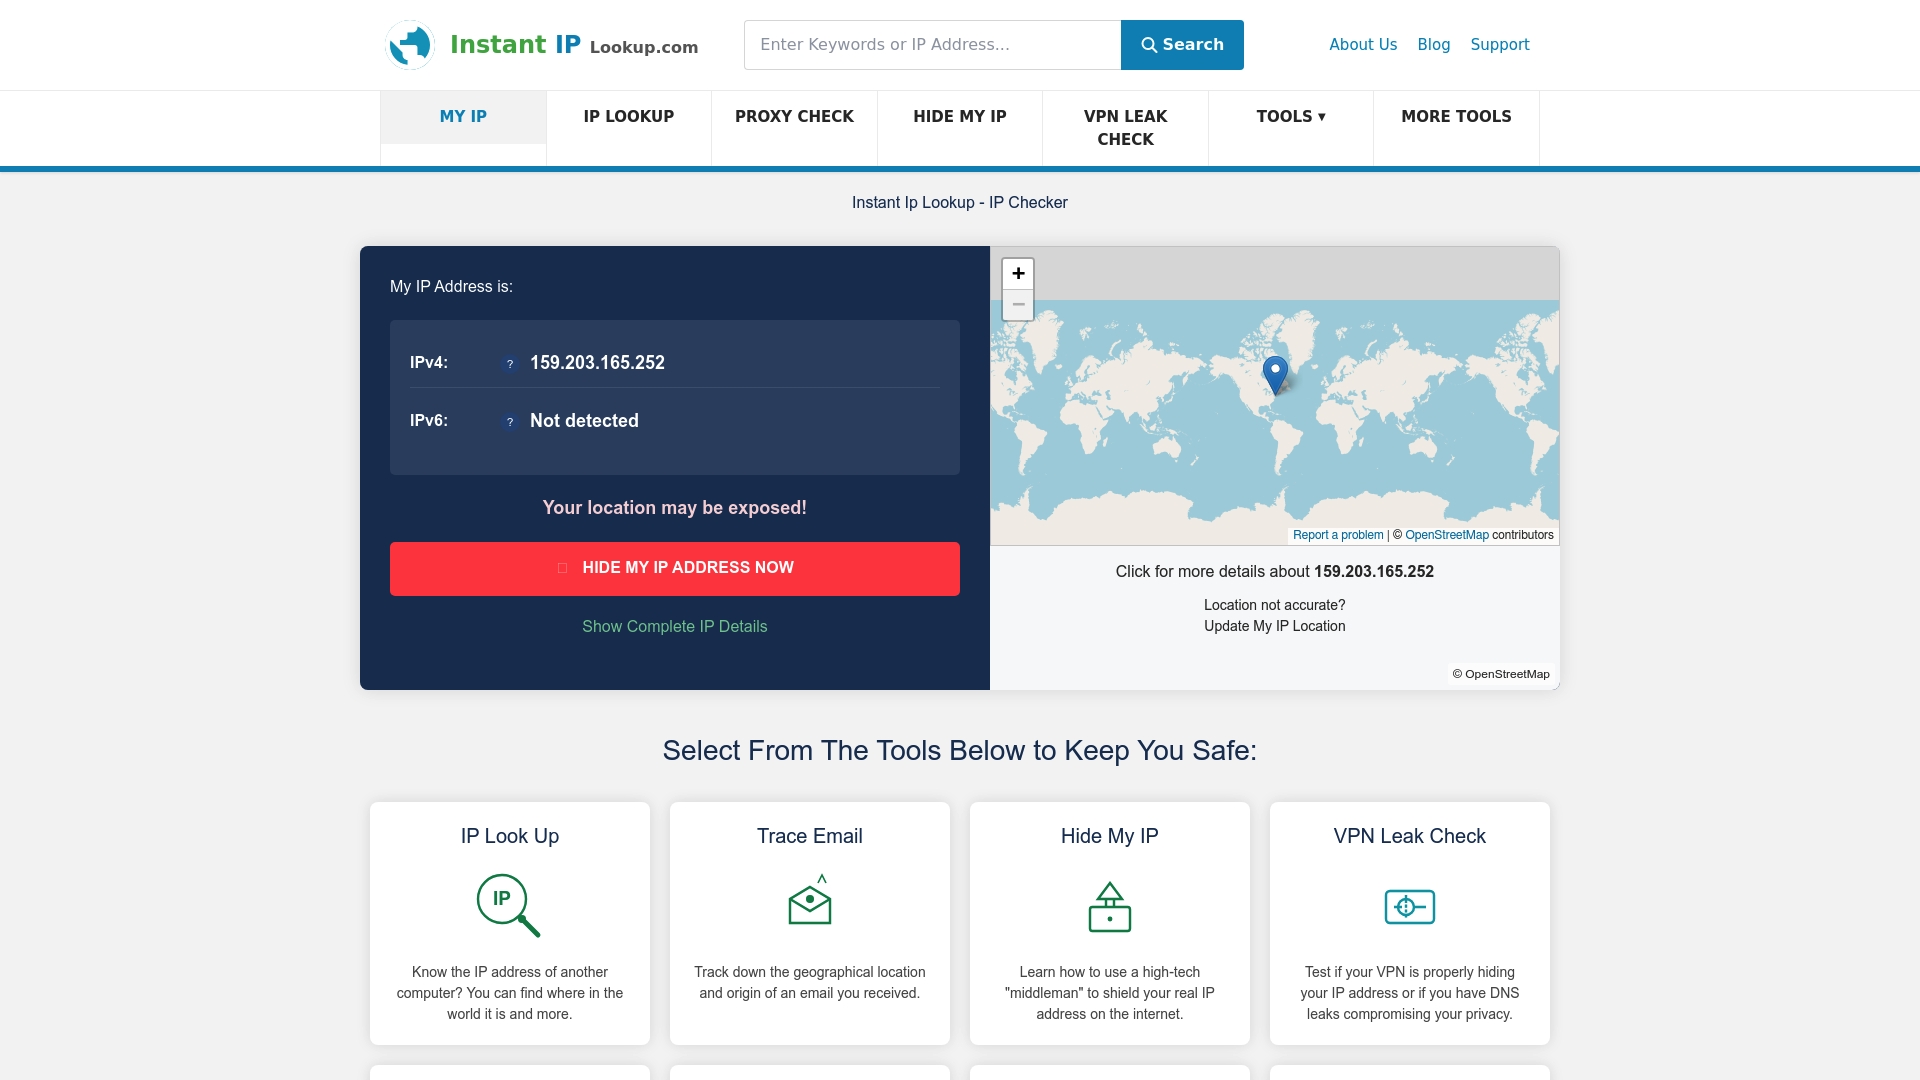
Integrated diagnostic tools streamline the process of maintaining your privacy defences. A thorough VPN leak check examines DNS, WebRTC, and IPv6 protection simultaneously, giving you a complete picture of your security posture in seconds. Understanding IP geolocation mechanics helps you interpret test results accurately and distinguish genuine leaks from harmless geolocation database quirks. These resources support both casual users testing their VPN effectiveness and advanced users conducting detailed privacy audits across multiple connection scenarios.
FAQ
What is an IP leak?
An IP leak happens when your real IP address becomes visible to websites or services despite using privacy tools like VPNs or proxies. This exposure reveals your approximate location, Internet Service Provider, and potentially your identity, defeating the purpose of anonymity tools. Leaks occur through various technical pathways including DNS requests, WebRTC protocols, and IPv6 traffic that bypass your encrypted VPN tunnel.
How can I test if my VPN is leaking my IP?
Use specialised VPN leak check websites that detect IP, DNS, and WebRTC leaks simultaneously. Run tests on multiple platforms to avoid false positives caused by outdated geolocation databases. Compare your displayed IP and location against your VPN server’s expected details, and verify that DNS servers match your VPN provider’s infrastructure rather than your ISP’s servers.
Can free VPNs protect me from IP leaks?
Free VPNs leak IP or DNS information in over 70% of cases due to inadequate security features and lack of proper tunnel configuration. Premium VPNs with independently audited security, system-level kill switches, and full IPv6 support provide reliable leak prevention. The cost difference between free and premium services is minimal compared to the privacy risks of using unverified free alternatives.
How do I disable WebRTC leaks?
Disable WebRTC through your browser’s advanced settings or by installing privacy extensions that block STUN server queries. In Firefox, type “about:config” in the address bar and set “media.peerconnection.enabled” to false. Chrome users can install extensions like WebRTC Leak Prevent or uBlock Origin with WebRTC blocking enabled. These methods prevent browsers from revealing your real IP through peer connection protocols whilst maintaining normal browsing functionality. For comprehensive protection, combine browser settings with WebRTC leak prevention at the VPN level.
Comments (0)